
A unique feature in Ochno hubs is the ability to control the flow of communication setup, the initial handshaking, between the device and the connected screen and USB peripherals. In most cases the standard Ochno settings will work out of the box. If you experience monitors not being found by your computer, or cameras not showing up on certain laptop models, consult the settings described below.
Which settings you can configure varies depending on which product you have and the firmware version.
Settings in detail
Turn screens on/off using HDMI CEC
Enable this and the hub will send an ON signal to the screen using HDMI CEC protocol when a port is set to active. An OFF signal is sent when no port is active.
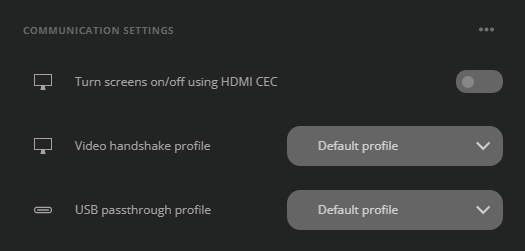
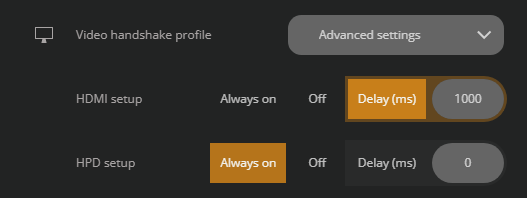
Video handshake profile
From the hub’s point of view the system has two handshakes to consider. The one coming from the HDMI and the one coming from the active device. These channels can be individually controlled.
* While the hub can manipulate the state of the connections, it cannot view the actual video stream between the screen and the device.
HDMI Setup
A delay specifying how long the hub waits before it allows the active device to start an HDMI handshake with the screen. Simply put, this simulates removing the HDMI cable from one computer and putting it in another.
The lower the delay is the faster the device can connect to the monitor, however the lower the delay is the more problems may arise when switching between ports.
Setting ”Always on” may not work with your monitor. Setting ”Off” will effectively not start the handshake at all and no video will be shown.
* Note that time it takes for the device to show video not only depends on this timer, devices and screens differ in how fast they can actually set up the video once the handshake has begun.
HPD Setup
A delay specifying how long the hub waits before it starts the video channels in the USB-C port with the active device. Simply put, this simulates moving the USB-C cable from one computer to another.
Generally this can be set to ”Always on” as long as ”HDMI Setup” has a delay. Setting ”Off” will not allow any video to be shown.
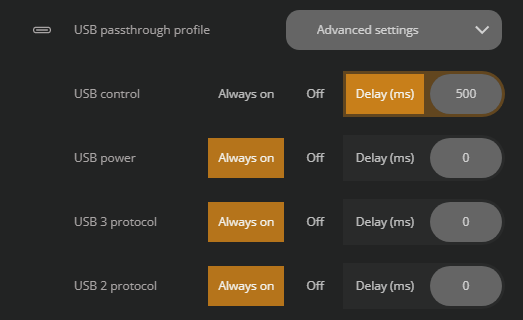
USB passthrough profile
There are multiple layers of the USB that can be controlled, from USB controller to power to protocols. The hardware boots up in the following order 1) USB control 2) USB power 3) USB protocols.
All the delays start at the same time, which means setting a delay on the protocols will have no effect if the USB control has a longer delay. In that case the protocols will be available at the same time as the USB control.
USB control
A delay specifying how long the hub waits before it starts the internal USB controller when active device changes. Simply put, this simulates moving a USB peripheral from one computer to another.
USB power
A delay specifying how long the hub waits before it enables power to the USB passthrough ports.
USB 3 protocol
A delay specifying how long the hub waits before the USB 3 protocol can be used.
USB 2 protocol
A delay specifying how long the hub waits before the USB 2 protocol can be used.
In most cases a USB passthrough peripheral will choose the fastest protocol available. In case it does not, try setting a longer delay on USB 2 than USB 3 and it should force USB 3 to be chosen (make sure the delay is longer than any control or power delay).
Terminology
Hub: The Ochno Power Conference.
Ports: The hub’s USB-C ports.
Active port: The port that is currently connected to the hub’s video and USB peripherals (passthrough). Only one port can be active at a time.
Button: Any kind of Ochno button, such as the Ochno LED Socket.
Device: Your computer, phone, tablet, or anything else that connects using the USB-C port.